Recommended process – TestFlight (iOS)
Ever wondered how iOS App builders send out apps to test before release?
Well that’s because they’ve been able to test them and get back valuable feedback! Here at Mobiddiction, we use the Apple recommended process of inviting users to test apps with TestFlight.
How do you test apps using TestFlight for iOS?
The application allows you to test iOS apps and get some valuable feedback before they’re released on the App Store.
Apple does this to avoid users downloading test apps directly onto their phones and streamlines the process of distributing iOS App testing builds.
Apple has two types of testers.
1. Internal testers: This is usually a team member or a client who has been assigned role in App Store Connect. Up to 25 testers can be added.
2. External testers: Once you’re ready to get some public user feedback, anyone with an email address can be added as an external tester and will have access to versions that you make available to them. They have no access to your iTunes Connect account in any way, and can only download and install the app. Up to 10,000 external testers can be added.
Note that this is the official process with Apple to test apps before public release. Apple does not allow for a way for developers to send app install files to be side loaded onto devices. This is against Apple’s distribution policy.
It is recommended to use TestFlight for iOS apps.
Step 1
Send your Apple ID to your developer
Send your email ID associated with your Apple ID to the developer. This is the same as your email used to purchase apps and music on iTunes.

Step 2
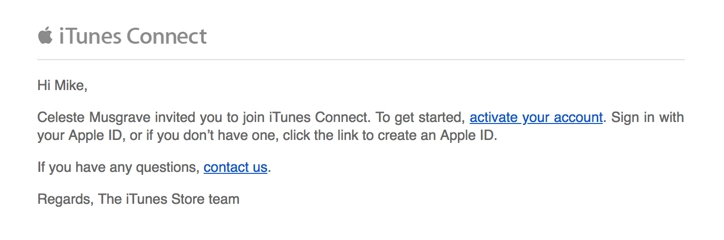
Your developer will email you an invitation to join as a user
iTunes Connect will send an invitation to the new user. You need to verify your email address before the account will show in iTunes Connect. You should find an email with the subject line “Welcome New iTunes Connect User“ in your mailbox. All you have to do is click “activate your account“, once this is done, the tech developer will be able to send you a TestFlight invitation.
Step 3
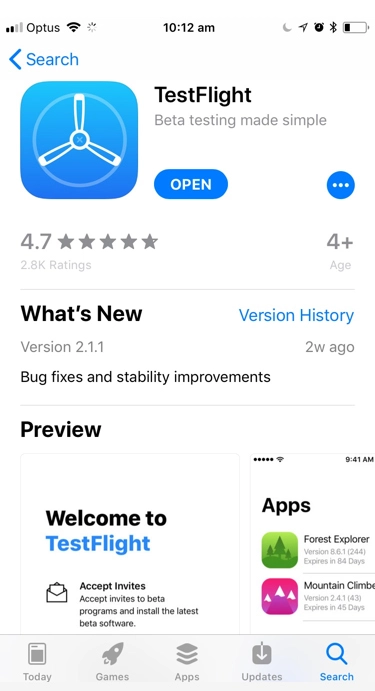
Download the TestFlight app on your iOS device
Step 4
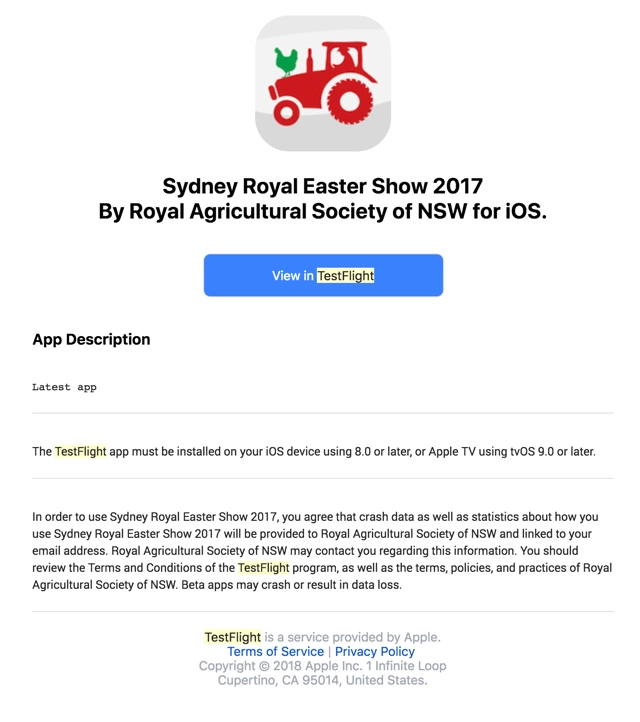
Redeem code
Once the app has been made available for testing, you receive an invitation from TestFlight to try it out. Open this invitation email on the device you’re using and click on “View in TestFlight”. Once TestFlight opens, redeem the code from the provided universal link and open the app preview page. Click Install and this will download the app to your home screen.
Step 5
You’re ready to test.
Now you’re all ready to test the app. Once downloaded, you will see an orange dot next to the app name. This is to differentiate it from other apps downloaded from the App Store. From now on, whenever a new version of this app is available, you’ll get a notification from TestFlight. All you need to do is update it and run the latest version.
Share test iOS Apps
How to use Public Links to Invite Testers to TestFlight?
Public links lets you share test iOS Apps outside your development team without email or other contact information using a Public URL link. You are able to share the public URL on social media, messaging platforms, emails, and more to expand the visibility of your beta test. According to Apple “If you don’t have an established group of external testers, using public links can be an effective way to increase your app’s reach and grow your test audience”
How to enable a public testing link in Test Flight:
Step 1: Go to your app’s TestFlight page.
Step 2: Click an existing group, and click Enable Public Link.
Step 3: Copy the link and share it outside your organisation.
You can limit the number of testers who can join the testing group. Testers can share crashes and screenshots directly to TestFlight.
Find out more on Apple website: HERE
TestFlight App link as your users will need this to download what developers distribute. The distribution is version controlled and you can also add notes in each build. TestFlight app link is HERE.
Get your feedback
How to access TestFlight testing feedback?
Step 1: Go to your app’s TestFlight page in App Store Connect.
Step 2: Click Crashes or Screenshots in the Feedback section.
Testing Apps thoroughly means that you will end up delivering a much higher quality product. It is always a good idea to send test builds to a variety of users using different devices as they will have different screen sizes, resolution and also different operating systems.
Good luck beta testing your iOS Apps!
